Monday, June 22, 2015

Update on the Lighting Styles

My last post had a couple of small errors so the images I got were not up to what I wanted to display so...

First boo boo.  The earlier post had the two lights too close together.  I really needed to put them at least 30 degrees to the right and left


This is how we normally would copy artwork and I never use this lighting system for portraits.  I understand that some people consider this "glamour" lighting so if that's their opinion, by all means.  I don't care for it for this reason.


The light is flat, the two catchlights in the eyes are distracting and it may be hard to see but there are cross shadows coming off both sides of the nose.  For proper portrait lighting, there's usually only one shadow from the main light.  Can it be improved by lowering the power of one of the lights?  Maybe and the sample is below:

I saw a set of portraits recently where one looked better than the other.  I looked carefully and the one that looked better had only one light that fired.  The other light misfired but gave a better roundness and depth to the image.


Now there is a highlight side and a shadow side which is what we strive for in normal portrait lighting.  It still lacks something so if one adds a hair light, it adds even more depth.


IMHO, a better lighting system would be an over/under system with a hair light.  It creates a "butterfly" shadow which was used in the portraits in the early days of Hollywood.  The light under is added to soften the shadows on the face but retaining the "butterfly" shadow.


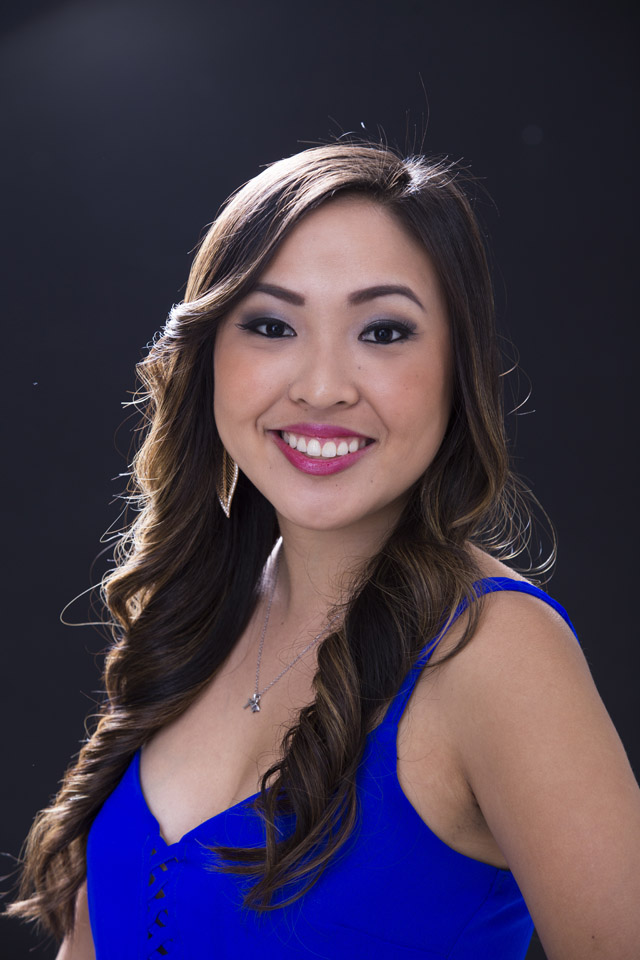
This light has more form and depth and can be improved (separating the head from the background) by adding a hair light.


What am I leaning towards?  Probably the beauty dish with a six light setup.  Main, Fill, Background, Hair Light, and two Kicker Lights.


This is the a basic three light setup.  Main, Fill (bounced against the white wall to create the base exposure) and a background light.  And a reflector under the face.


 It's ok but would look better with the addition of a hair light.  The hair light has a light amber gel inserted to add some warmness to the hair.


I'll probably consider using the kicker lights to add more depth to the portraits.  They come in from behind the subject and skim the body.


I have to emphasize that there is no "RIGHT" portrait lighting technique.  There are about as many different styles as there are photographers.  The "right" technique is the one that flatters and makes the subjects look their best..

Saturday, June 13, 2015

How do different studio lighting setups look in the actual portrait?

With the new pageant season coming, I thought I'd do a test on the different lighting setups I have access to and see which one would give me the best looking portraits for the jobs I'll be doing.

The first one is derived from what I've seen in some of the other pageants.  It's two lights equal distant from each other.  The one I'm showing here is probably too close to each other and should be further apart.  I never use this so pardon the error.


The light is flat and non directional but has very little depth if any.


I thought if I lowered the power of one of the lights it may help in defining the depth.  Helps a bit but to me, something is still missing.


Late last year, I saw an advertisement for an "Omega" reflector which was supposed to make it simpler to create a "glamour" light and the samples looked great.  Purchased it, got it in and here is the setup that I use.


The main light is behind your subject and it's designed to be out of camera range and one stands in front of the reflector shooting through the opening in the reflector.  The main light bounces off the reflector and acts as the light source.


It's ok but I have yet to tweak the positioning and light source to my satisfaction.


I needed more depth so I put a "kicker" light to the other side of the subject.


A little better but I now have to deal with flyaway hairs.


I've seen several posts/tutorials on utilizing one light at the 12 o'clock position to create the glamour light and another light below that with the photographer shooting between them to create a flat "glamour" light.  I took two of my flash units, put a soft box on them and positioned them at 12 & 6 o'clock positions.


A lot better light than the side by side.


I like to have the hair illuminated so I usually try to insert a hair light but with only two lights, I opted to use a small reflector under the subject's face .  The second light is placed behind the subject and high skimming the head.  The light in the front blocks the hair light from spilling into the camera


Now we are getting a separation between the background and the head.


It looked fine but I lost some detail in the shadows.  I switched to a larger reflector so I could get more light into the shadow area.


Getting better and if I add a background light, I'll be close to what I want.  At this point I switched to my primary lighting system that I used this past year which was a beauty dish attached to a power pack power system vs. Monolights.  I also added a Fill Light which was aimed against a white wall to get some base illumination.  The Fill Light is bounced against the white wall in the background.  I am also using a Beauty Dish vs. a Soft Box or Umbrella for the main light as I prefer the snap the Beauty Dish gives to the face illumination.


 I also added a background light to separate the background from the subject.  The big reflector is under the beauty dish.


Not bad but still needs a bunch of tweaks.


First thing is to add a hair light.  I have one on a boom with a grid on the reflector to aim the light more accurately and I also added an amber colored filter to warm up the hair.


Another option is instead of the reflector, is to use a Strip Light in place of the reflector.  This is placed under and in front of the subject.


Add the hair light and we have:


The last image in this post uses (1) a Fill Light, (2) the Main Light - Beauty Dish, (3) the Hair Light on a boom behind subject, (4) the Background Light, (5) the Large Reflector and (6) a set of two Kicker Lights.  The Reflector with the opening on the left side of the image is not in use.


It's what I may be doing this year depending on what kind of background is needed.  And I'll deal with the loose hairs post production.


Tuesday, January 27, 2015

Westcott's new Omega reflector

I saw a post someplace about Westcott's new Omega lighting system.  It was an interesting post about how this reflector has a puka (hole) in the middle of the reflector, one puts the main light behind your subject which allows it to act as a hair light and bounces off the reflector to light your subject.


So I preordered one.  It took almost two months before B&H had it in stock but I just got it in yesterday.  Since I had a headshot session scheduled, I traded the session cost if the model would be a test subject for the reflector.

How did I set it up?  Out of the box, it has three layers.  A gold side, a silver side and a white translucent side.  All three have the center section velcroed on to the main layer.  It can be used as a regular reflector but the way I wanted to use it, I had to remove the velcroed sections.

I then needed to light stands and some clamps to secure the reflector so I could work with it by myself.  Sorry for the mess in the background.  It's the nature of a pack rat.


The light is set up behind the subject (next to the background) and aimed at the reflector.  The reflector is used as a scrim to prevent the light from the flash from hitting your camera lens.


The subject sits fronting the reflector and one takes the photo aiming the camera through the puka (hole).


This is what it looks like from camera position.


And the final look.  I still need to do some tweaking and also to try and work this so I can use flash units that are battery powered units.


Not too bad for a single light and a single reflector.


Thursday, May 8, 2014

The Beauty Dish

In all my years as a photographer, I've always used natural light as much as I can.  The main reason was that I usually worked by myself and to carry all the extra lights was not something I liked to do.  It taught me how to "see the light."

What I've noticed over the last couple of years that a lot of photographers are using off camera lighting to tweak their photos.  I've noticed the dramatic lighting and thought maybe it's about time I changed my thinking.  Since I had light stands, it was a matter of figuring out which flash units to use and which light triggers to use (aka radio slaves).  I had used the shoe mounted flashes on light stands but I needed something with a better light than the direct flash.    I had noticed a lot of use with Beauty Dishes and actually had a pair of studio reflectors that someone had given to me about 20 years ago.  Found them in my garage, cleaned them up and now use that in the studio. 

The challenge for outdoors was to find something that won't fall over in the wind which made umbrellas impractical unless I had an assistant which is not very often.  Even my single flash units are not immune to the wind and waves as I found out on one of my sessions when my flash unit, battery pack and radio receiver went swimming in the ocean.

After doing much searching, here's what I came up with.  A 12" Optecka Beauty Dish for portable flash units.


The dish's bracket mounts to a light stand with a 5/8" mount. 


 One then mounts the flash unit on the bracket and adjusts the position.  I think I'll need to get some rubber washers for the future
This is the correct mounting to get the most effect out of the flash unit's light.


The silver cap in front of the flash disperses the light to the entire dish spreading the light to a larger area.  Of course when one does this a lot of the power is lost.  For you techies, with this flash (a Neewer TT850, the guide number at 10' is 56 at ISO 200.  It's not practical for me to use this at the beach at sunset but it's great to add a punch of light in other scenarios.


Here's a setup of the flash on location.  The stand is a Cheetah stand which makes it easy for me to pick up and place (best on a hard or flat surface).


An image taken without the flash.  It's fine and most people will feel this is acceptable and I did at one time.


Add the flash and it's a whole different look.  All images are straight out of the camera.


Even headshots (closeups) benefit from the inclusion of the beauty dish.  This is without the flash and it looks fine.


 Add the flash and the image has more punch and a cleaner more defined light.
And after applying a little bit of Photoshop tweaks...